FH2 News Render Tutorial
Merge
Open the render scene template, then save it with proper filename. Remember to save often, 3dsmax likes to crash. Merge in the vehicle from a cleaned up scene.
Setup Materials
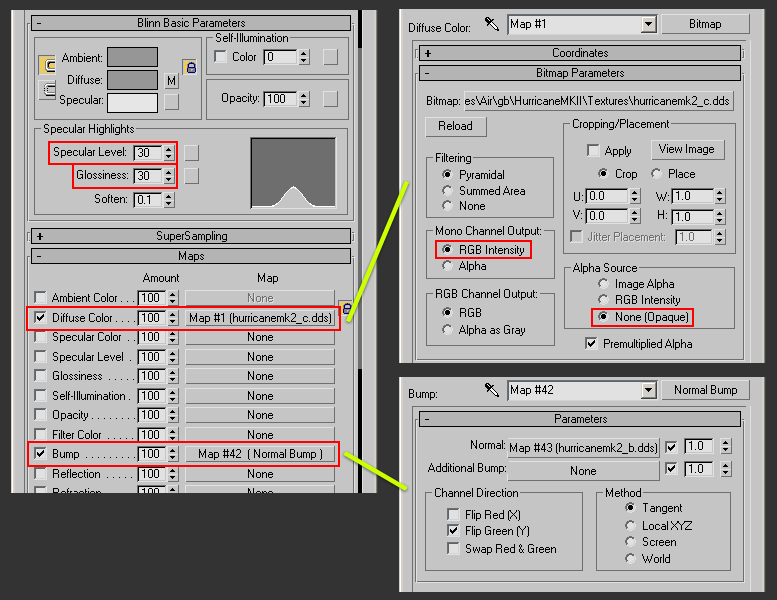
Fix the texture paths. Use standard material with default settings. Tweak specular settings, 30-30 is usually a good start.For glass, change transparancy, and change the diffuse color to dark gray (slightly blue-ish or brownish if that looks good). If you know what you're doing, try Fresnell Falloff map in alpha for realistic transparancy, but not always beneficial.
Remember to set the bumpmap strength to "100.0", it is always "30.0" by default. If the bump effect is very faint, you may increase it a bit to enhance the appearance.
Safe Frame
First thing we do is toggle "Safe Frame" so we can properly see what will fall inside the camera view and what falls outside. Try to keep everything inside the blue line, unless this causes the vehicle to be very far away from the camera and hiding small details. If the vehicle is partially outside the view, try to show those parts on the 2nd vehicle in the background.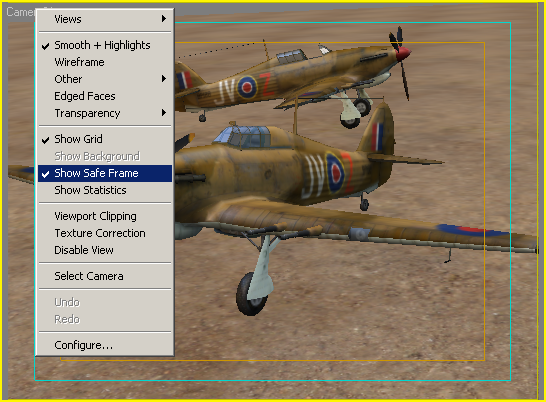
Composition
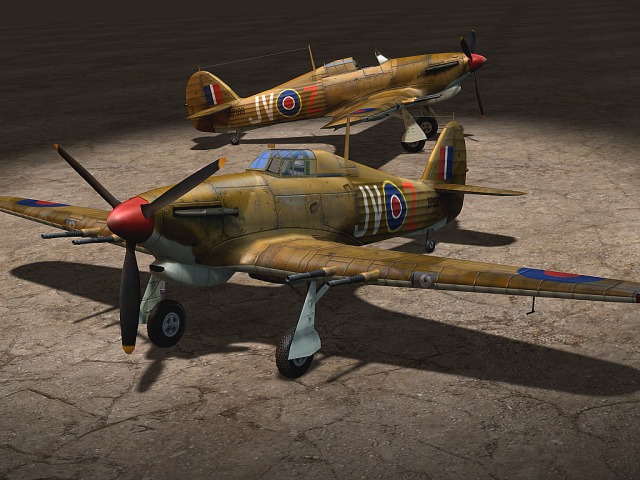
Place the vehicles in an interesting but neutral pose. Put one in the foreground, showing the front of the vehicle turned slightly to the side. In the background, show the rear/side. Avoid overlap, or small detail sticking out (for example tank turret guns, airplane antenna etc.) or the details may conflict.Rotate tank turrets to show all sides. Pull back the cockpit canopy. If there are several variations of vehicle parts, show different sets on the foreground and background vehicle (e.g. aircraft drop tanks/guns, tank stowage). If there are more than one skins, pick the two most different ones and put each of these on the vehicle. Apply the most common look on the front vehicle.
For lighting, we don't use ambient occlusion, radiosity or any sort of advanced lighting; we show the art in it's own natural beauty without faking anything. We use a traditional three point light setup: one directional light (which is the key light) that casts shadows, a blue fill light and an orange back light.
1) Adjust the directional light so it casts interesting shadows and give the depth to the image.
2) Adjust the fill light (blue) to enhance the dark areas.
3) Adjust the backlight to show a orange highlight to enhance the silhouette.
This is all I can say about composition. It is something you must feel to do get it right (and experiment).
Renderer Filter Settings
We switch then renderer filter settings to "Catmull-Rom". This results into nicely sharp edges and textures. It's similar to sharpening filters in PhotoShop and similar software, but is a bit nicer because it works in 3d-space rather than 2d-space. Has no noticable impact on rendering performance; use it.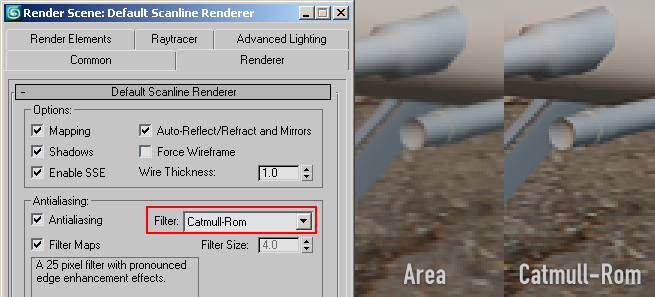
Super-Sampling Settings
Often the bump/normal mapping leads to aliasing, we can counter this by enabling super-sampling. You can enable it per material, or alternatively globally (via render settings). Increases render time a bit, so I usually enable it only on the vehicle materials and not the ground.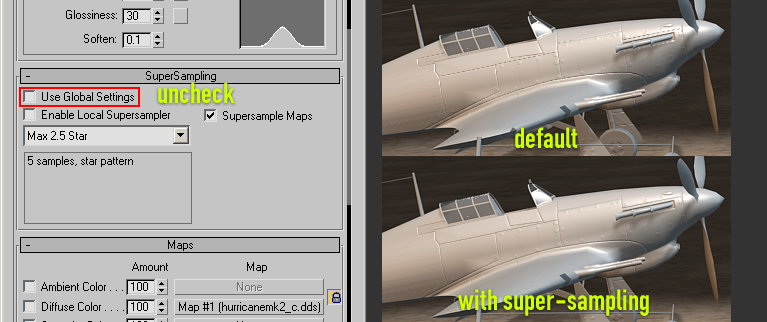
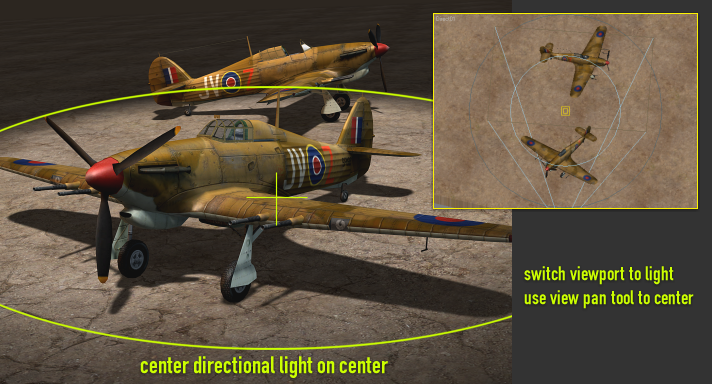
Center Key Light
We center the directional light on the center of the image. Since it comes in at a different angle this may be a bit tricky to get right in one try, so do some quick renders until you it fits.The idea is that when the light falls on the center of the image it draws the attention of the viewer to the center of the image.
Try to keep the vehicle in the foreground well lit, though near the near corners it's ok if its a bit darker (e.g. wingtips or tank gun barrel close to camera).
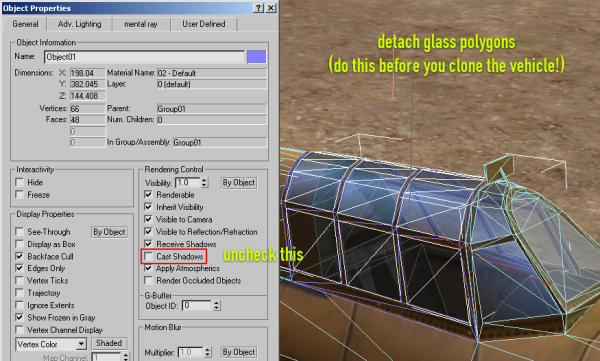
Alpha Shadows
Shadow mapping in 3dsmax doesn't work with transparant materials/textures, so in some cases we have to detach the polygons with alpha materials, and disable the shadow casting on that object.It's not always easy to get this right, for example on tank wheels that use alpha. In that case, don't touch it and fix any errors in the final render PhotoShop (usually the corners of the tank drive wheel sticking through front fenders).
Tweak Shadow Bias
Because we use shadow mapping, there may be some light bleeding through shadow casting polygons with the default settings. We can fix this by decreasing the "bias" property on the directional light. Usually 0.1 is a good start. With very round shapes you may start seeing some staircasing artifacts. Usually this is not very visible in the final render with textures and all, but if it does, increase the value until it is acceptable.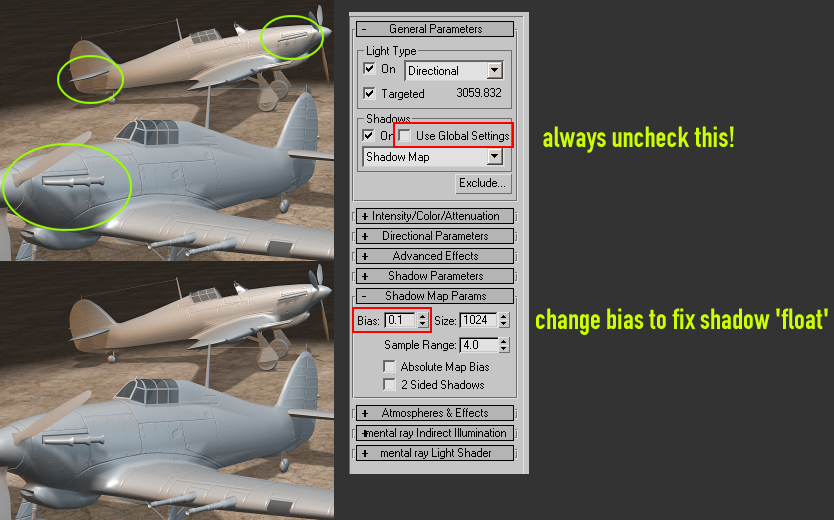
Add Extra Specular Highlights
If the render now still looks a bit boring or unrealistic, you can add some extra hightlights by placing a few extra lights, that only add specular highlights. You can do this by unchecking "diffuse" on the lights. Usually you place these lights opposite to the camera, at a hight angle. Preview in the viewport and move the light around until you've got something interesting.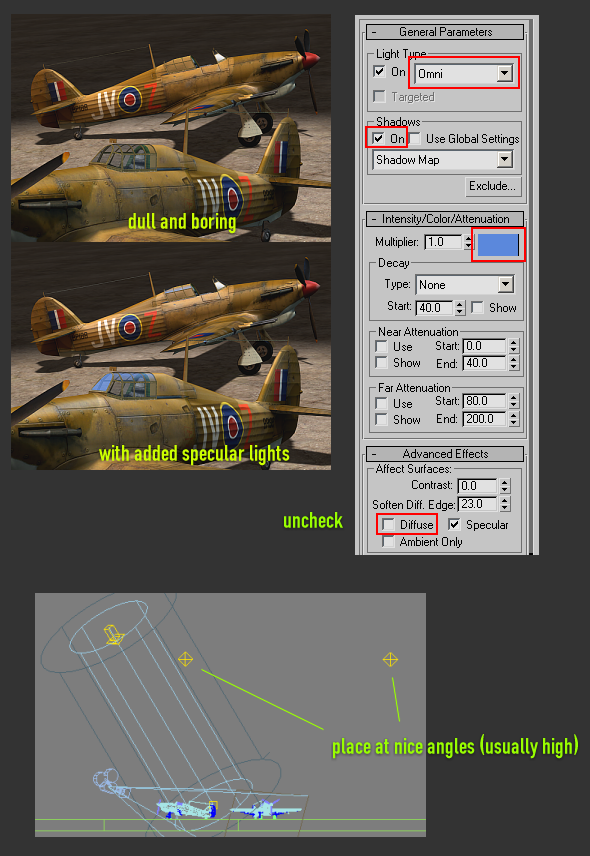
Background Color
We change the background color in case the ground doesn't fully cover the image. Most of the time this will be covered by the top/bottom banner anyway, but we do this just to be sure and don't need to fix it in PS.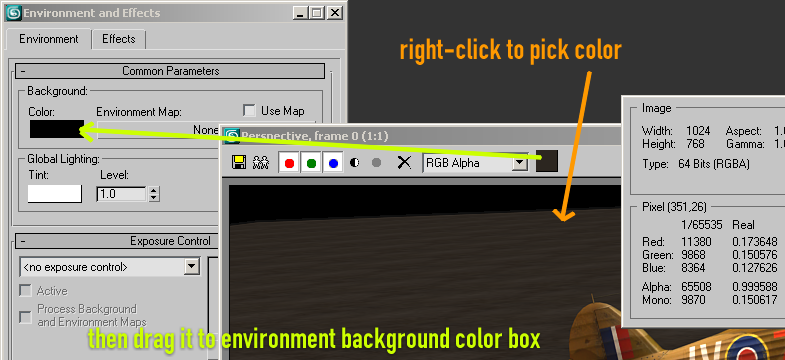
Final Render
Then render it and you're done. Save it as PNG without alpha. Hide the ground, and do another render and save it as PNG with alpha. This can then be used to create a mask to lift the vehicle from the background.If you're going to upload it to FHSTAFF FTP and let someone else add the banners, in PhotoShop, extract the alpha from 2nd render and save it as grayscale PNG to save server disk space.
Add Banners & Credits
Then in PS, open the news render template PSD, use alpha to layer the vehicle on top over the bars, add a very fuzzy drop-shadow to it so there's a slight shadow over the borders. Try to avoid the vehicle layer getting close to, or overlapping, the banner text.Done!